
How to Improve PC Startup Time
Updated April 21, 2010 to include new steps for Windows 7
When you hit the “on” button of your PC, your computer must load a number of different programs to launch the operating system and other supporting applications. Each of these takes time—even a brand new PC will often take a minute or more to get up and running. While there are many programs your PC needs to run properly, most manufacturers bundle a number of “trial” programs or proprietary applications that are of little value.
Over time, most PC owners will install yet even more applications – instant messaging programs, Skype, AOL, Picture Editing Software, etc. – that just add to the overhead and cause startup times to get longer and longer. Follow these steps and you may see a significant improvement in your PC's startup performance:
Step 1: Remove Startup Programs
Believe it or not, there are very few programs required to be loaded at startup. Most can (and should) be started manually from the Start menu when, and if, you actually need them. So, often a simple cleaning will get your computer running like a champ. Follow these steps to get things back in order:
- Make sure you have a program that protects against viruses, spyware and adware. Norton and Kapersky both have highly rated products that protect against all three threats. If you have virus protection installed, it is unlikely that a virus or other evil program is causing the lethargic behavior. If you don't have protection, check out our Computer Security Buyer's Guide. Be sure to turn on “auto updating,”, so you always have the latest virus protection files and schedule the program to do a full scan once a week. And be wary of ads on the Internet for “free” virus scans or protection programs – many of these are actually scams to get you to download malicious software or purchase unnecessary programs.
- Hit your Start button on your screen and go to the Programs menu. You should see a folder called Startup. Inside this folder are shortcuts to programs that will be loaded on, you guessed it, startup. If you don’t need these programs to be loaded automatically, delete the shortcut by right-clicking on the icon and hitting Delete. Don’t worry, you’re not deleting the actual program, just a shortcut that tells the computer to load it. When you need to run this program, you can just browse to it from the Start menu and load it up.
- Click the Start button and hit “Run”. In the window that comes up, type “msconfig” into the Open field and click “Ok”. This will bring up the System Configuration application. Click on the tab that says “Startup” and it will bring up a list of every application that is being loaded on top of Windows. In Windows 7, you can also get to the System Configuration application through the Control Panel (Start>Control Panel>System and Security>Administrative Tools>System Configuration).
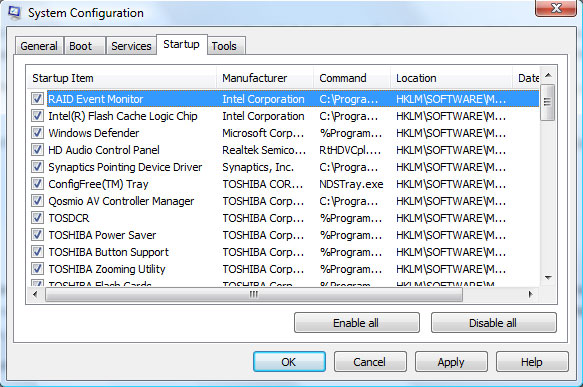
Now this next part starts getting a little technical, but stick with it, because this is where you can significantly improve your computer’s startup speed.
Look through the list of Startup items and ask yourself the question, “Do I need this program to start every time I run Windows? Or can I just start it up when I need to use it?” Programs such as RealPlayer, Adobe Acrobat, Apple Quicktime will often be in this list even though there is really no need to load them at startup. To remove a program from the startup list, simply uncheck the box next to it. Again, this does not delete the program. It simply stops it from loading automatically. Try to remove everything you don’t need and you may see a big difference in your PC’s performance.
If you’re not sure what a program does (and this is a common issue, even for tech experts), there’s a great website www.sysinfo.org/startuplist.php that lets you to look up the name of startup programs and tells you whether they’re needed, not needed, optional, or (worse!) a potential virus threat. Pay close attention to the name of the Startup Item and the Command name (usually an “.exe” file); much of the time, virus programs and valid programs have very similar names. If you still can’t identify the program or you’re not sure if you need it, just leave it alone.
When you are done reviewing the Startup items, click "Ok". You will get a message telling you to restart your computer, which you can do now or wait until later. After you restart, Windows will give you a message letting you know that you are using “Selective Startup”. Click “Ok” and you’re all set. If you have any problems because you unchecked something by mistake, just pull up msconfig again and recheck the item.
Helpful hint: When you are installing a new application on your PC, pay attention to any “extras” that are included in the installation process. Often this will be indicated by a checkbox on one of the installation screens that will say something like “Install Yahoo! Toolbar” or “Install iTunes.” If you don’t need or want them, your best bet is not to install them.
Step 2: Free Up Space on your Hard Disk
Your computer uses space on your hard disk to store temporary program files. If your hard drive is too full, your computer won’t have room to store all these files—and this can significantly impact performance. Check to make sure you have at least 10% of your hard disk free. This is easy to do by right clicking on your "C:" drive in My Computer and selecting "Properties."
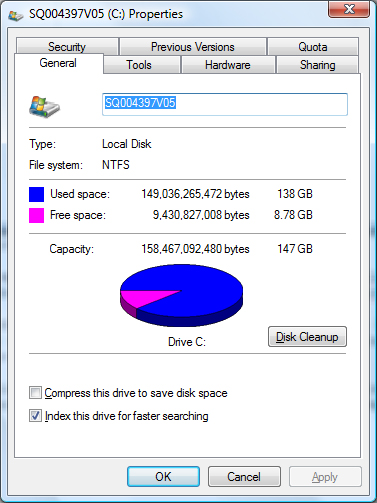
If the “Free Space” is less than 10% of “Capacity,” it is important you make more room. A simple way to do this is with Windows Disk Cleanup. You can get there through Start>Program>Accessories>System Tools>Disk Cleanup. Or, in Windows 7, Start>Control Panel>System and Security>Administrative Tools>Free up disk space.
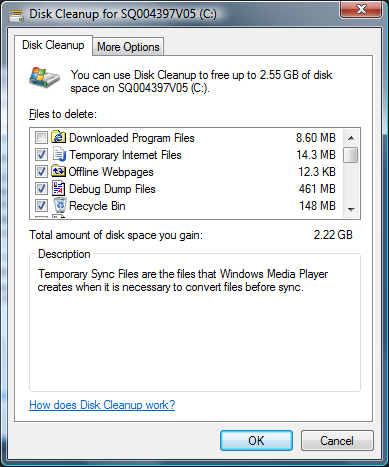
- On the first "Disk Cleanup" tab, you will be given the option to delete various temporary files and empty your Recycle Bin, with a measure of how much disk space you will gain. Generally speaking, there should be no harm in deleting these files.
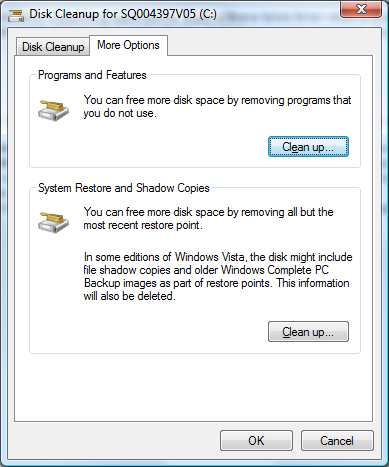
- Now go to the "More Options" tab (Depending on your administrative settings in Windows 7, this tab may not appear initially. If it doesn't, click the button that says "Clean up system files", choose your drive and now the tab should appear). Here you will have the option to clean up "Programs and Features." This will allow you to uninstall any programs you never use, especially games (which can take up considerable space). Click the "Clean up" button. Then highlight the program(s) you want to uninstall and click the "Uninstall" button.
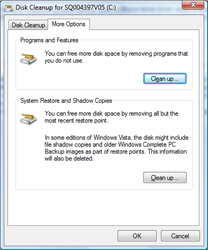
- Also on the "More Options" tab there is an option to clean up "System Restore and Shadow Copies." These backup files allow you to restore your computer to an earlier time, in case something goes wrong, or recover files and folders that you may have accidentally deleted. Windows will store many versions of the backup files and, over time, they can take up a huge amount of space on your hard drive. Clicking "Clean up" will delete all but the most recent version.
gr8
ReplyDeleteI have lot many programs configured to be loaded on my computer startup.I never cared about these and it slow down the computer start up.With your blog I now have only needed ones on startup as all others were not frequently used.Thanks
ReplyDeleteeSignature